
We all view or compare multiple sections of the same document or object sometimes. Mostly where you need to carry out tasks simultaneously or play video games with other players. The process of splitting the screen on the Macintosh laptop is easy.
However, splitting screens or windows is sometimes tricky for most people due to various reasons. You can split-screen on Mac using Mac’s Split View or the Split Screen Ultimate application.
How to utilize Split View to split screen
Mac has a built-in Split screen mode known as the Split view that enables you to split screen automatically. There is no more jumping back and forth between applications or windows. You can now comfortably multi-task.

Below are simple steps to utilize split view on Mac;
Start by opening two or more windows you desire. On the upper left side of your Mac, you will find three dots, which will aid in managing your windows.
Click on the green dot, a list of options will appear. These options include; Enter full screen, Tile window to left of the screen, and Tile window to the right of the screen.
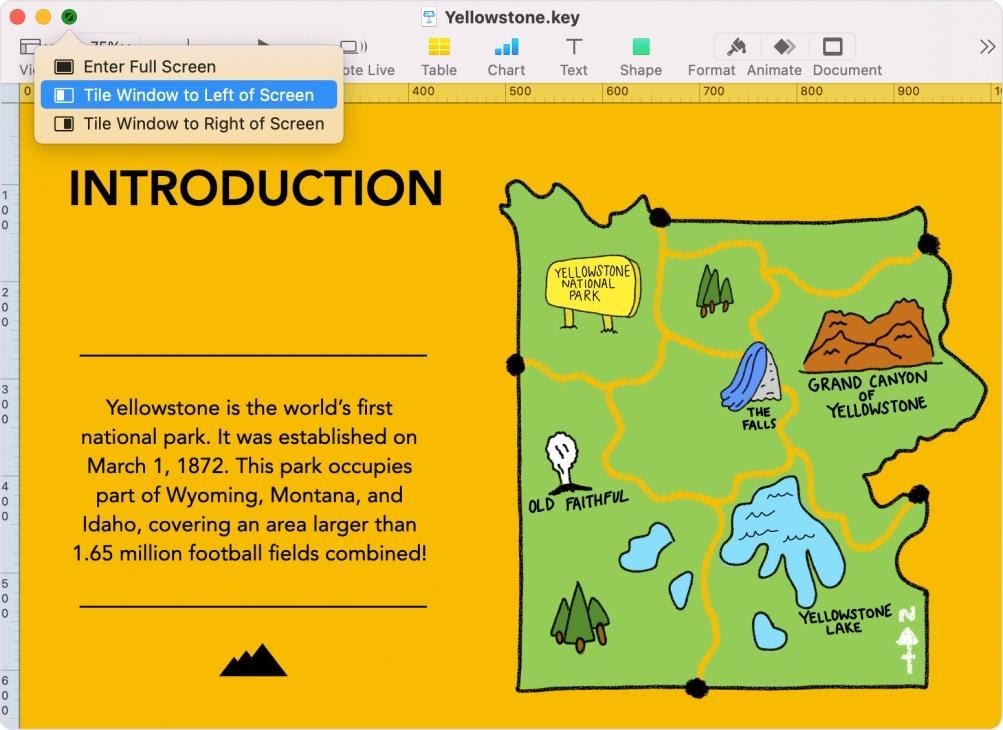
Select one of the windows, and then pick the option Tile window to left or Tile window to the right. If you select the Tile window to the left, the selected window will be displayed halfway on your left side.
To organize windows into even halves, select the window you want to view, then click on the Tile window to the right option. The window will appear on the right of your screen.
To adjust the windows, move the cursor over the bar separating the two windows. Broaden the right window and narrow the left window by dragging the bar to the left. Double click on the bar if you wish to return to the original size.
If you want the windows to change sides, Click and hold the app’s title bar and drag it over to the opposite side. The windows will naturally interchange.
When using Split View, the menu bar will automatically hide. Just move the pointer to the top of the screen, and it will reappear if you wish to resume to your original state; press Esc or click on the green dot. Your windows will immediately return to their original state.
How to split screen using Split Screen Ultimate app on Mac
Split Screen Ultimate is an app that splits, resizes, and restores windows with just a click. It achieves these using window snapping features and customizable keyboard shortcuts.
The app offers a ton of ways to split and resize windows. It enables the screen to split into three parts. Moreover, it supports the vertical and horizontal split options.
The app has various features such as; drag and snap features like Microsoft Windows, multi-lingual support, dual monitor support, et cetera et cetera.
Split Screen Ultimate has a friendly user interface and is easy to utilize.
Here is the step-by-step guide to split-screen using Split Screen Ultimate;
The first step is to install the Split Screen Ultimate application.
Open two or more applications or windows you require to work with on your Mac. The app has a web search for speedy access to applications. For example, you can open Spark Mail and PDF Expert.
Click on the Split Screen ultimate tool displayed on the menu bar. A list of options will appear. These options include; shrink options, three parts sizing options, dual monitor options, restore window, and full screen.
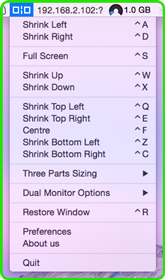
Select the opened window of your choice, and then click the shrink right option. The window will appear on the right half of your screen.
To adjust and organize the windows into even halves, click on the other window, then the shrink left option. The window will appear on the left side of your screen.
To centralize a window you desire, click on it, then the centre option. Select the shrink up or down option to shift the windows up or down the screen.
To shift a window to the top left corner, click on it, then select the Shrink top left option. If you want it to the right, choose the shrink right option.
To move the window to the bottom left, click on it, followed by the Shrink bottom left option. Select the shrink bottom right if you want the window on the bottom right.
If you wish to view one of the windows on full screen, pinpoint it, then click the full screen option.
We have various options under three parts sizing; Shrink left third, shrink right third, shrink middle third, and horizontally. These shrink applications divide windows into even-sized thirds.
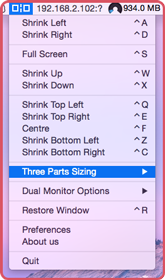
Click on the shrink middle third option to allocate the selected window to the middle. To allocate the selected window to the left, click on the shrink left third option .If you want the selected window on the right, click the shrink right third option.
You can add another monitor in case one is not enough. Split Screen Ultimate has a lot of intriguing dual monitor options.
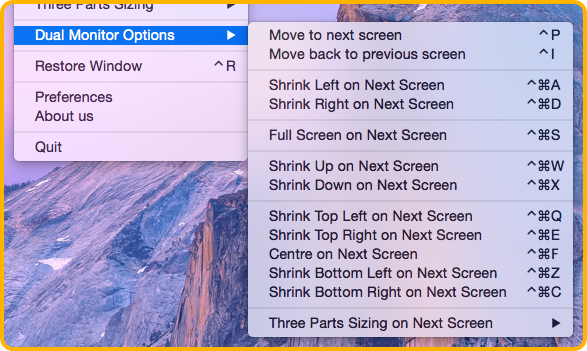
To automatically move a window to the top left of the next screen, click on it, then select the shrink top left option. If you want the windows on the top right, choose the shrink top right option.
To shift the windows to the bottom right of the next screen, click on it then the shrink bottom right option, while to move it to the bottom left, pick the shrink bottom left option.
To restore and resize your windows, select the resize window options.
Conclusion
Splitting screens or windows is now fast, thanks to Split Screen Ultimate and Split View. They are the best and easiest ways to split-screen. They contain well-organized and comprehendible features.
Moreover, splitting screens has myriad benefits. These benefits include improved productivity, ease of switching of tasks, less desk space, improved communication, improved work flexibility and others.
Let us all utilize Split Screen Ultimate and Split View when tackling our tasks to reap the full benefits of splitting the screen.


